And here we are…celebrating the end of one of the most adventurous, unexpected and vulnerable years of our life. The year 2020.
While most part of this year has been spent with family quarantined at home and creating lots of memories together, there’s nothing that beats the fun of crafting together. And that too when it’s the season of Christmas!
I love Christmas. It’s absolutely the best ever holiday! And one of the things I love best is quality time spent with my children – baking, decorating the tree and the gingerbread house, and making new decorations to hang on our tree.
Well, when it comes to Christmas tree decoration, chances are you have a big box of last years’ ornaments that you use each year to decorate your tree, like vintage baubles, bells, stars etc.
But this year, you may find yourself at home more, which makes it the perfect time to start a new Christmas tradition- DIY Christmas ornaments you can make with your kids.
Making homemade ornaments is a fun family activity that everyone from toddlers and preschoolers to teens and full-grown adults can enjoy. Plus, it’s a great excuse to stay in your comfiest holiday pajamas, crank up the holiday music, and sip on some hot cocoa. All you need to do is set aside an afternoon for your family to get together and round-up your supplies. Chances are you already have plenty around the house, like ice cream sticks, coloured papers and the like.
So here are a few easy-peasy DIY Christmas Ornaments You Can Make With Your Kids.
1. Popsicle stick Christmas tree ornament
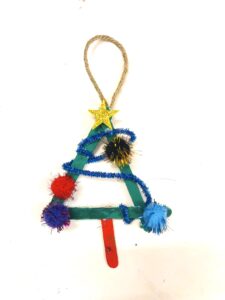
This quick diy craft requires:
Popsicle sticks, a few colours pom-poms, decorative material like stars, buttons etc, pipe cleaner (optional).
Just stick the popsicles together in the shape of a triangle. Let the child paint as per colours of their choice. Decorate the same with materials available like pom-poms, buttons etc. Put a twine on top for hanging and we are ready!
2. LED Snowman Christmas Tree Ornament
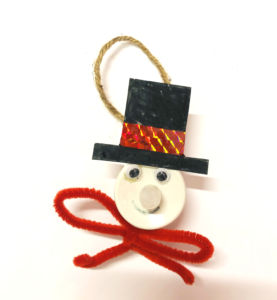
This cute little snowman will take your heart way! These tea light snowman ornaments are really easy to make and they look ADORABLE! Who would have thought you could make such a cute Christmas ornament just by using leftover tea lights from Diwali?! When you turn on the tea light the “flame” becomes the snowman’s carrot nose! Ha ha ….Talk about adorable!
Things you would need:
LED light (Diya), some black paper for making the hat (or use white paper and colour it black), red pipe cleaner, googly eyes, red shiny tape.
Make the face using google eyes and a black marker for smile. Glue the hat together with some hot glue, so you end up with something like this (refer pic above). Make a knotted bow using red pipe cleaner. Use a glue dot to fix the twine loop for hanging. And here we are!
3. Mini Wreath Christmas Tree Ornament
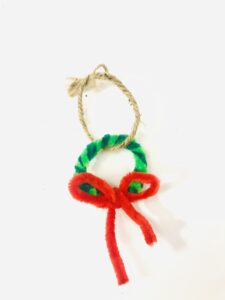
These mini Christmas wreath ornaments would look so festive on the tree. It is an adorable craft that requires little prep and almost no clean up!
Things you would need:
2 pipe cleaners (1 light green and 1 dark green), 1 pipe cleaner (red) and a string, twine, or yarn for the hanging loop.
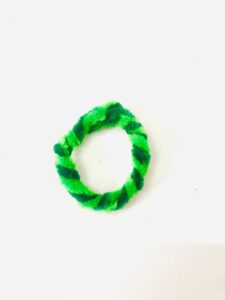
Twist the 2 green pipe cleaners to combine them together as shown below.
Twist along the entire length of the pipe cleaners. Once the 2 pipe cleaners are twisted together, fold them in half and twist again. Next, twist the ends of the pipe cleaners together to form a ring, as shown below.
Where the ends of the pipe cleaners are twisted together, add the red mini pipe cleaner and twist it onto the ring.This will help keep the wreath held together, and will also be used to create the decorative bow.
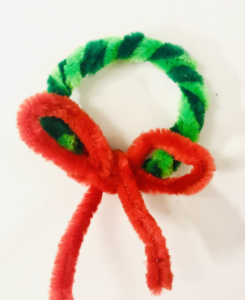
Once the wreath is complete, add the string to create a loop to hang your mini wreath ornament on the tree!
4. Salt dough Fingerprint Christmas Tree Ornament
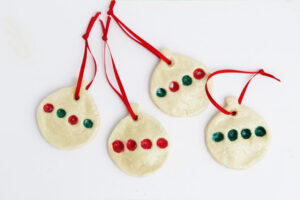
We love how easy and versatile salt dough ornaments are to make for the holiday season. For this salt dough fingerprint ornament, your child’s fingerprints will turn plain salt dough ornaments into a special memory for your Christmas tree! This one is one of our favorites really when it comes to homemade Christmas ornaments as the whole family takes part in making it. Make a new one each year and watch the little fingers grow. Such a cute and personalised idea.
Here’s what you will need:
Salt, Flour, Water, Ribbon, Ornament Cookie Cutters, Red and Green Paint, Skewer or Straw to make the hole for hanging.
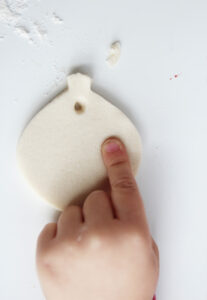
Make salt dough and roll it until it’s about 1/2 inch in thickness. Cut the ornament shapes out of the dough using your cookie cutter. Use a skewer or straw to make a hole in the top of the ornament. Press your child’s fingertip into the wet dough.
Once the dough has finished baking (for approx 3 minutes in microwave), paint the insides of the fingerprints with green or red paint. Loop ribbon through the hole and tie it.

This one is going to be the best keepsake ideas for Christmas! Pressing fingers into the soft dough can be a great sensory activity for little ones and mom and dad will love seeing the little fingerprints for years to come!
Don’t forget to write the year on the back with the Sharpie before you finish!
5. Growing Crystal Christmas Tree ornament

What’s with STEM and Christmas decoration? Well, infinite number of options to create!
Growing Crystal Ornaments is a science you can hang on your tree! These crystal hearts made from pipe cleaners and a simple borax solution are SO COOL. And they’re really easy to make! Leave them overnight and crystals magically form!
Things you would need :
Borax powder, water, pipe cleaners to make the shape, heart shaped cookie cutter, ribbon or sting to hang, popsicle sticks, mason jars for the experiment.
Make a few shapes as per choice out of pipe cleaners- like star, heart etc. Tie a thin ribbon on top . Insert this heart in an empty mason jar by tying from the top with a popsicle stick. Mix together the borax and boiling water until the borax is completely dissolved. Carefully pour the hot borax solution into the mason jar. Set the jar in a warm place where it can be observed but not touched or bumped. This is a great project to start in the morning as you can watch the crystals slowly form throughout the day. Final outcome- beautiful crystal shapes that will add a charm of its own to your Christmas tree.
Hope you enjoy creating memories together while indulging in these simple family DIY crafts for Christmas.
Go Mommy!